|
|
Using ImageBadger as an Image Resizer
The image converter ImageBadger supports over 140+ image formats and 40+ image filters, including an image resizer. In this article I'll show you how to use ImageBadger's image resizer to create thumbnail photos.
And it couldn't be easier to do! ImageBadger can be used through the Windows Explorer right-click menu. This means you can convert and resize images in a snap!
First we need to create a "Make Thumbnail" filter profile which we can load through the right-click menu in Windows Explorer. The ImageBadger filter profile is basically a list of modifications (such as resizing the image) that you want ImageBadger to perform on the images. This is very useful as it allows you to quickly load up often used image filters, such as resizing images, whenever you need to modify your images.
After installing ImageBadger, simply right-click on the images you want to resize, and from the pop-up menu that appears, choose "Open ImageBadger".
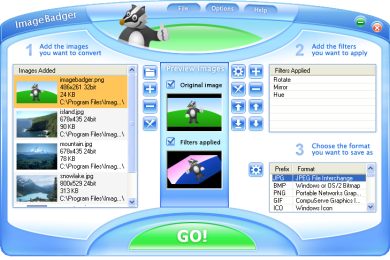
The image above shows how the main window looks. Now let's create the filter profile. Click on the "+" next to the "Filters Applied" filter list (on the right side of the window). Now a window with all the filters available in the program will be shown. Select the "Resize" filter and click on OK. After this, double-click on the Resize filter in the filter list.
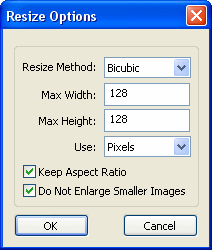
The window shown in the image above will appear, and you can configure how you want the image resizer to behave.
Let's say that you want to create thumbnail photos of all your images, being max 128 pixels wide and max 128 pixels high, and to keep the aspect ratio of the images (not stretch and ruin the images).
To do this, just enter 128 as the width and height, and check "Keep Aspect Ratio". You could also check "Do Not Enlarge Smaller Images" if you want. Now click on OK.
Now right-click on the filter list, and select "Save Profile". Enter the name "Make Thumbnail" or something similar. Click on OK. Now you have created a filter profile! You can now close ImageBadger, and go back to Windows Explorer.
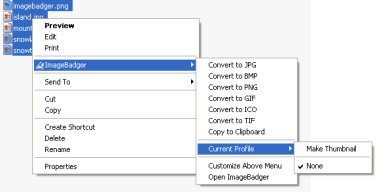
When you now want to use the profile, simply right-click on the images you want to use the resizer on. In the "Current Profile" menu, click on "Make Thumbnail" to check this profile. Now you have enabled this profile, and it will be applied on all the conversions you do through the right-click menu in Windows Explorer.
Right-click on the images you want to resize, click on the format you want to convert them to, and voila, the images should now be converted and resized properly! If you want to disable the profile, simply go to the "Current Profile" menu again, and click on the profile once more, and it will be dechecked.
Hint: Using the filter profile from the Windows Explorer right-click menu will save you A LOT of time if you need a batch image resizer, and need to resizer large amounts of pictures, or regulary need to resize pictures.
And there you have it! A demonstration of how you can use ImageBadger as an image resizer!
|
|